Four Asanas are prescribed for the purpose of Japa and meditation. They are Padmasana, Siddhasana, Svastikasana and Sukhasana. You must be able to sit in any one of these four Asanas at a stretch for full three hours without shaking the body. Then only you will get Asana-Jaya, mastery over the Asana. Without securing a steady Asana, you cannot further get on well in meditation. The steadier you are in your Asana, the more you will be able to concentrate and make your mind one-pointed. If you can be steady in the posture even for one hour, you will be able to acquire one-pointed mind and feel thereby infinite peace and Atmic Ananda.
When you sit on the posture, think: “I am as firm as a rock”. Give this suggestion to the mind half a dozen times. Then the Asana will become steady soon. You must become as a living statue when you sit for Dhyana. Then only there will be real steadiness in your Asana. In one year by regular practice you will have success and will be able to sit for three hours at a stretch. Start with half an hour and gradually increase the period.
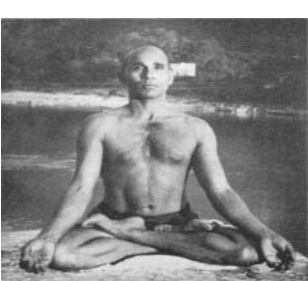
Amongst the four poses prescribed for Japa and Dhyana, Padmasana comes foremost. It is
the best Asana for contemplation. Rishis like Gheranda, Sandilya, speak very highly of this vital
Asana. This is highly agreeable for householders. Even ladies can sit in this Asana. Padmasana is
suitable for lean persons and for youths as well.
Sit on the ground by spreading the legs forward. Then place the right foot on the left thigh
and the left foot on the right thigh. Place the hands on the knee-joints. You can make a fingerlock
and keep the locked hands over the left ankle. This is very convenient for some persons. Or you can
place the left hand over the left knee and then place the right hand over the right knee with the palm
facing upwards and the index finger touching the middle portion of the thumb (Chinmudra).

Next to Padmasana comes Siddhasana in importance. Some eulogise this Asana as even superior to Padmasana for purposes of Dhyana. If you get mastery over this Asana, you will acquire many Siddhis. Further it was being practised by many Siddhas of yore. Hence the name Siddhasana.
Even fatty persons with big thighs can practise this Asana easily. In fact this is better to some persons than Padmasana. Young Brahmacharins who attempt to get established in celibacy should practise this Asana. This Asana is not suitable for ladies.
Svastikasana is sitting at ease with the body erect. Spread the legs forward. Fold the left leg
and place the foot near the right thigh muscles. Similarly bend the right leg and push it in the space
between the thigh and calf muscles. Now you will find the two feet between the thighs and calves of
the legs. This is a very comfortable Asana. Those who find it difficult to do this, can sit in
Samasana.
Place the left heel at the beginning of right thigh and the right heel at the beginning of the left
thigh. Sit at ease. Do not bend either on the left or right. This is called ‘Samasana’.
Any easy, comfortable posture for Japa and meditation is Sukhasana, the important point
being the head, neck and trunk should be in a line without curve. People who begin Japa and
meditation after 30 or 40 years of age generally are not able to sit in Padma, Siddha or Svastikasana
for a long time. People sit in any wrong way and they call it ‘Sukhasana’.
The trouble is even without their knowledge the backbone forms a curve in a few minutes. Now I will
describe to you a nice Sukhasana whereby old persons can sit and meditate for a long time. Young persons
should not try this. This is specially designed to suit old people who are unable to sit in Padmasana or
Siddhasana in spite of repeated attempts.
Take a cloth 5 cubits long. Fold it nicely length-wise till the width becomes half a cubit. Sit
in your usual way keeping the feet below your thighs. Raise the two knees to the level of your chest
till you get a space of 8 or 10 inches between the knees. Now take the folded cloth. Keep one end
near the left side, touching the right knee, come to the starting point. Then make a knot of the two
ends. Keep your palms face to face and place them on the support of the cloth between the knees. In
this Asana the hands, legs and backbone are supported. Hence you will never feel tired. If you
cannot do any other Asana sit at least in this Asana and do Japa and meditation for a long time. You
can also have Svadhyaya (study of religious books) in this Asana.

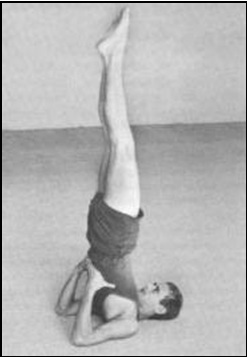
Spread a four-folded blanket. Sit on the two knees. Make a finger-lock by interweaving the
fingers. Place it on the ground up to the elbow. Now keep the top of your head on this finger-lock or
between the two hands. Slowly raise the legs till they become vertical. Stand for five seconds in the
beginning and gradually increase the period by 15 seconds each week to 20 minutes or half an hour.
Then very slowly, bring it down. Strong people will be able to keep the Asana for half an hour
within 2 or 3 months. Do it slowly. There is no harm. If you have time, do twice daily both morning
and evening. Perform this Asana very, very slowly, to avoid jerks. While standing on the head,
breathe slowly through the nose and never through the mouth.
You can place the hands on the ground one on each side of the head. You will find this easy
to practice, if you are fat. If you have learnt balancing, you can take to the finger-lock method. This
Asana is nothing for those who can balance on parallel bars or on the ground. Ask your friend to
assist you to keep the legs steady while practicing or get the help of a wall.
In the beginning some persons may have a novel sensation during practice but this vanishes
soon. It brings joy and glee. After the exercise is over take a little rest for five minutes and then take
a cup of milk. There are people who are doing this Asana for two or three hours at one stroke.
This is a mysterious Asana which gives wonderful benefits. Spread a thick blanket on the
floor and practise this Asana on the blanket. Lie on the back quite flat. Slowly raise the legs. Lift the
trunk, hips, and legs quite vertically. Support the back with the two hands, one on either side. Rest
the elbows on the ground. Press the chin against the chest (Jalandhara Bandha). Allow the
back-shoulder portion and neck to touch the ground closely. Do not allow the body to shake or
move to and fro. Keep the legs straight. When the Asana is over, bring the legs down very, very
slowly with elegance and not with any jerks. In this Asana the whole weight of the body is thrown
on the shoulders. You really stand on the shoulders with the help and support of the elbows.
Concentrate on the Thyroid gland which lies on the front lower part of the neck. Retain the breath as
long as you can do with comfort, and slowly exhale through the nose.
You can do this Asana twice daily, morning and evening. This should immediately be
followed by Matsyasana (fish-posture). This will relieve pains in the back part of the neck and
intensify the usefulness of Sarvangasana. Stand on the Asana for two minutes and gradually
increase the period to half an hour.
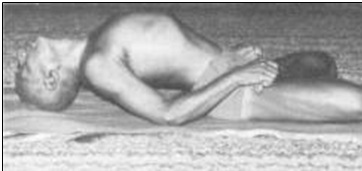
This Asana will help one to float on water easily with Plavini Pranayama. Therefore it is
called fish-pose, Matsyasana. Spread a blanket and sit on Padmasana by keeping the right foot over
the left thigh and the left over right thigh. Then lie flat on the back. Hold the head by the two elbows.
This is one variety.
Stretch the head back, so that the top of your head rests on the ground firmly on one side and
the buttocks only on the other, thus making a bridge or an arch of the trunk. Place the hands on the
thighs or catch the toes with the hands. You will have to give a good twisting to the back. This
variety is more efficacious than the former one. The benefits that you derive from this variety are a
hundred times more than what you get in the previous variety.
Those fatty persons with thick calves, who find it difficult to have Padmasana (foot-lock),
may simply sit in the ordinary way and then practise this Asana. Practise the Padmasana first. Make
it firm, easy and steady. Then take Matsyasana. Do this Asana for 10 seconds in the beginning and
increase it to 10 minutes.
When you have finished the Asana, slowly release the head with the help of hands and get
up. Then unlock the Padmasana.
You must practise this Asana soon after Sarvangasana. It will relieve stiffness of the neck
and all crampy conditions of the cervical region caused by long practice of Sarvangasana. This
gives natural massage or shampooing to the congested parts of the neck and shoulders. Further it
affords the maximum benefits of Sarvangasana. It is a complimentary Asana of Sarvangasana.
Rather it supplements Sarvangasana. As the larynx or wind-box and trachea (wind-pipe) are thrown
open widely, this Asana helps deep breathing.
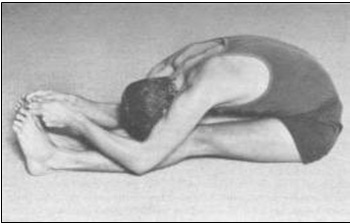
Sit on the ground and stretch the legs stiff like a stick. Catch the toes with the thumb and
index and middle fingers. While catching, you have to bend the trunk forwards. Fatty persons will
find it rather difficult to bend. Exhale. Slowly bend without jerks till your forehead touches your
knees. You can keep the face even between the knees. When you bend down, draw the belly back.
This facilitates the bending forward. Bend slowly by gradual degrees. Take your own time. There is
no hurry. When you bend down, bend the head between the hands. Retain it on a level with them.
Young persons with elastic spine can touch the knees with the forehead even in their very first
attempt. In the case of grown-up persons with rigid spinal column, it will take a fortnight or a month
for complete success in the posture. Retain the breath till you take the forehead back, to its original
position, till you sit straight again. Then breathe.
Retain the pose for 5 seconds. Then gradually increase the period to 10 minutes.
Those who find it difficult to do the full Paschimottanasana, can do half pose with one leg
and one hand and then with the other leg and hand. They will find this more easy. After some days
when the spine has become more elastic, they can have recourse to the full pose. You will have to
use common-sense while practising Yogasanas.
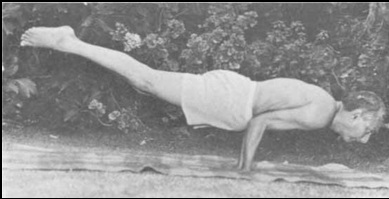
This is more difficult than Sarvangasana. This demands good physical strength.
Kneel on the ground. Sit on the toes. Raise the heels up. Join the two forearms together.
Place the palms of the two hands on the ground. The two little fingers must be in close touch. They
project towards the feet. Now you have got steady and firm forearms for supporting the whole body
in the ensuing elevation of the trunk and legs. Now bring down the abdomen slowly against the
conjoined elbows. Support your body upon your elbows that are pressed now against the navel or
umbilicus. This is the first stage. Stretch your legs and raise the feet stiff and straight on a level with
the head. This is second stage.
Neophytes (beginners) find it difficult to keep up the balance as soon as they raise the feet
from the ground. Place a cushion in front. Sometimes you will have a fall forwards and you may
hurt your nose slightly. Try to slip on the sides when you cannot keep up the balance. If you find it
difficult to stretch the two legs backwards at one stroke, slowly stretch one leg first and then the
other. If you adopt the device of leaning the body forwards and head downwards the feet will by
themselves leave the ground and you can stretch them quite easily. When the Asana is in full
manifestation the head, trunk, buttocks, thighs, legs and feet will be in one straight line and parallel
to the ground. This posture is very beautiful to look at.
Paschimottanasana and Halasana bend the spine forwards. Dhanur, Bhujanga and Salabha
Asanas are counter-poses to bend the spine backwards. This is not sufficient. It must be twisted and
bent from side to side also (lateral movements). Then only perfect elasticity of the spinal column
can be ensured. The Matsyendrasana serves this purpose well in giving a lateral twist to the spinal
column.
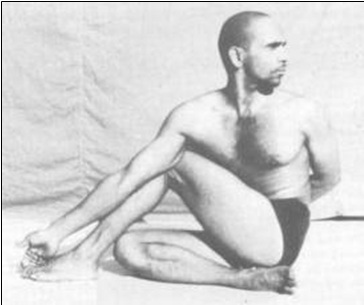
Place the left heel near the anus and below the scrotum. It can touch the perennial space. Do
not allow the heel to move from this space. Bend the knee and place the right ankle at the root of the
left thigh and rest the right foot well on the ground close to the left hip-joint. Place the left axilla or
arm-pit over the top of the vertically bent right knee. Push the knee now a little to the back so that it
touches the back part of the axilla. Catch hold of the left foot with left palm. Then applying pressure
at the left shoulder-joint slowly twist the spine and turn to the extreme right. Turn the face also to
the right as much as you can do. Bring it in a line with the right shoulder. Swing round the right arm
towards the back. Catch hold of the left thigh with the right hand. Retain the pose from 5 to 15
seconds. Keep the vertebral column erect. Do not bend. Similarly you can twist the spine to the left
side.

Those who sit in this Asana have a quite steady and firm pose. They cannot be easily shaken.
The knees are rendered very hard. Merudanda becomes firm and strong. This Asana resembles
more or less the Namaz pose in which the Muslims sit for prayer.
Keep the soles of the feet on both sides of the anus, i.e., place the thighs on the legs one over
the other and the soles on the buttocks. The calves must touch the thighs. The part from the toe to the
knee should touch the ground. The whole burden of the body is put on the knees and ankles. In the
beginning of practice you may feel a slight pain in the knee and ankle-joints but it passes off very
quickly. Massage the painful parts and two joints with the hands. You can use a little Iodex or
Amrutanjan for rubbing. After fixing the feet and the knees, put both the hands straight on the
knees. Keep the knees quite close. Sit like this keeping the trunk, neck and head in one straight line.
This is the most common Asana. You can sit in this Asana for a very long time comfortably. Yogins
generally sit in this Asana.
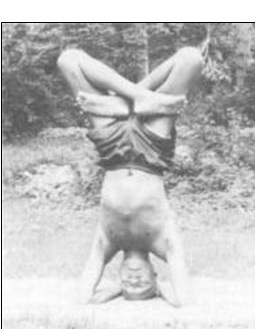
Perform Sirshasana. Slowly bend the right leg and keep it on the left thigh and keep the left leg on the right thigh. You must do this very carefully and slowly. If you can stand in Sirshasana for more than 10 or 15 minutes, then you can attempt this. Otherwise you will have a fall and injure your legs. A gymnast, who can balance on the parallel bars on the ground, can do this. The benefits of Sirshasana can be realised from this Asana.